Categories

Fortect Security Settings: Antivirus Essentials

George Picardal

In today’s digital environment, where threats are perpetually evolving, robust antivirus software is imperative. Fortect, renowned for its cutting-edge cybersecurity, provides a range of adjustable settings within Fortect Security Center, equipping users to fortify their defenses against these dynamic threats. This article delves into these settings, highlighting their importance in maintaining robust digital protection.

Cloud Protection: A Double-Layered Defense

Fortect’s Cloud Protection analyzes files in the cloud, using advanced technology to quickly identify and counter sophisticated threats. This enhances threat detection and boosts the effectiveness of its digital defense.

How Does Cloud Protection Work?

Fortect’s Cloud Protection performs advanced analysis on unfamiliar files or applications in the cloud, utilizing sophisticated algorithms to detect potential threats. This method provides significant advantages:

  1. Speed: Analysis in the cloud ensures fast processing, reducing the impact on device performance.
  2. Accuracy: Advanced algorithms in the cloud facilitate more precise threat detection, improving the likelihood of effectively neutralizing threats before they cause harm.

To enable Fortect’s Cloud Protection

  • Navigate to Settings -> Security.
  • Go Enhance Security with Cloud-Based Analysis.
  • Enable the toggle switch.
  • By default, this feature is enabled for optimal protection.

Whitelisting: Managing Exceptions

Whitelisting is a crucial feature in Fortect Security center, allowing users to specify trusted files, folders, and applications that should not be blocked or scanned. This ensures that essential software operates without interruption, enhancing both security and performance.

Here’s a full guide on effectively managing the whitelisting process within Fortect:

Scan Preferences: Tailored for Your Safety

Fortect allows users to customize their scan preferences. These settings offer a more granular control over how and what the antivirus scans, ensuring that you’re not trading off performance for protection.

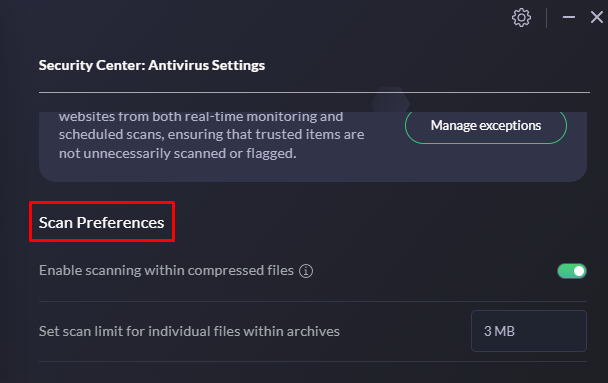
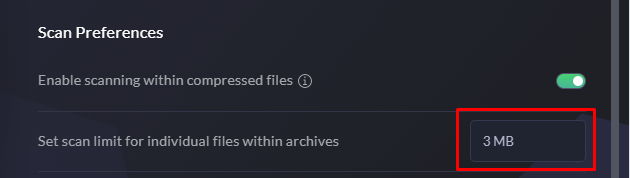
Enable Scanning within Compressed (Archives) Files

Fortect’s default setting enables scanning within compressed files, such as ZIP and RAR, to detect and quarantine hidden threats, ensuring comprehensive protection against malware in archives.

To enable scanning within compressed files

  • Navigate to Settings -> Security.
  • Go to Scan Preferences
  • Enable the toggle switch.
  • By default, this feature is enabled for optimal protection.

Setting Scan Limits for Individual Files within Archives

Fortect allows setting scan limits for individual files within archives, balancing thorough scanning and system performance. Users can configure the size limit in megabytes (MB) to ensure efficient scanning of large archives without impacting device speed.

To set the scan limit within archives:

  • Navigate to Settings -> Security.
  • Go Scan Preferences
  • Set scan limit in megabits > Enter new value -> Click Enter/Click anywhere in the settings screen
  • By default, this is set on 500 MB

Quarantine List: Managing Isolated Threats

Fortect’s Quarantine List is a secure holding area for suspicious files, acting as a buffer between potential threats and your system’s integrity. Understanding the need to manage these quarantined items effectively,

To review and manage files that have been quarantined by Fortect:

  • Navigate to Dashboard > Security
  • Click View Quarantine List
  • Select the desired action on the button at the button of the page.

Quarantine actions:

  • Delete Selected Items – This action will delete the files from the computer completely.
  • Exclude and Restore Selected – This option will add the selected files to exception list and will restore them to the original location.
  • Restore Selected Items – This option will restore the files to the original location, but they will be detected again.

Security Reports

Fortect’s Security Reports are dedicated to showcasing the vigilance and effectiveness of your security measures. These reports provide an overview of all protection activities, including detected threats, blocked attacks, and security scans.

To view your security reports:

  • Navigate to Settings > Security > View Security Reports

To view the full scan report:

  • Navigate to Settings > Security > View Security Reports
  • Click View Report
  • You can now review the full details of the scan

Scan History

Delving deeper into the specifics, the Scan History feature uncovers the details of each scan, including the threats detected and how Fortect handled them. This granular view into the antivirus’s actions allows users to understand the nature of the threats targeting their systems and the effectiveness of Fortect’s response mechanisms.

Auto-Delete Reports After a Set Period

Fortect allows for the automatic deletion of reports after a specified number of days. This feature ensures that only the most recent and relevant security insights are retained, making it easier for users to stay informed about their security posture without manual cleanup.

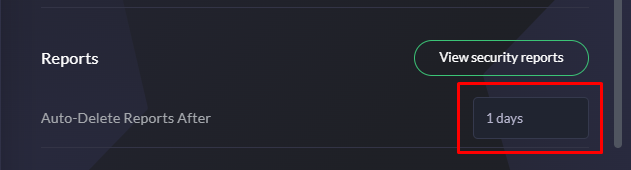
To set the auto-delete report function:

  • Navigate to Settings > Security
  • Under Reports > Auto – Delete Reports After
  • Set the number of days and hit Enter/Click anywhere in the settings screen
  • By default, this is set on 7 days

This Article Covers:
Was this article helpful?

These also might be interesting for you