
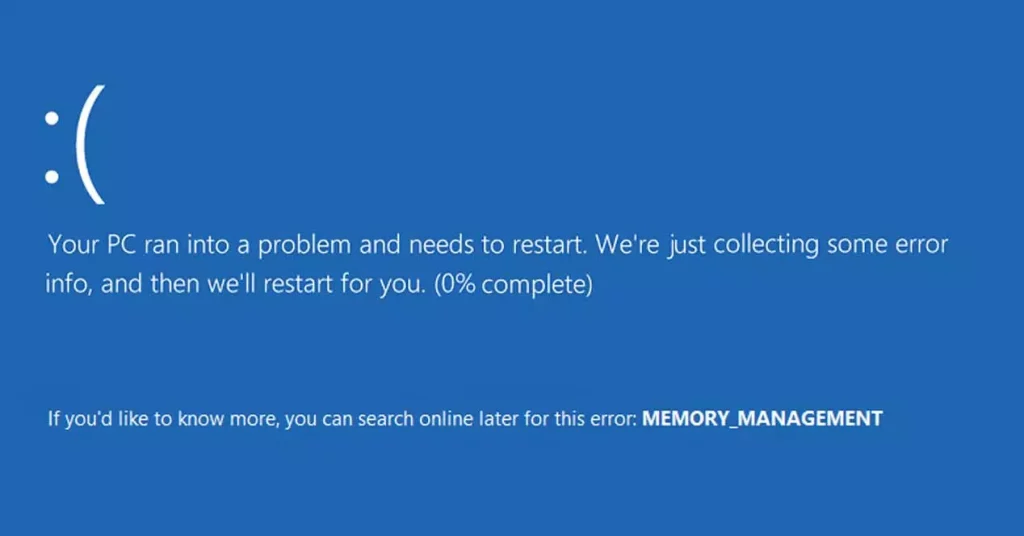
Resolved: Memory Management Blue Screen After RAM Upgrade
Getting a blue screen of death (BSoD) when you boot into your computer can be a shock, but there’s always a reasonable explanation and way to fix it. If the error occurs after upgrading RAM and you try to run a few programs, you’ll be dealt with the stop code: MEMORY_MANGEMENT, which is found at the bottom of the blue screen.
It usually takes time to diagnose the cause of a BSoD, but the new RAM stick is 99% likely to be the issue in this scenario.
So, what happened? I personally encountered this problem on my aging Windows 10 PC, when I was looking to give it a RAM boost for gaming. After spending hours online, this is what I discovered.
Why does the Memory Management blue screen happen?
MEMORY_MANGEMENT is the system’s way of saying it cannot access or process tasks related to memory. This can be a physical problem with the RAM stick or its slots on the motherboard, or corruption within Windows preventing it from functioning correctly. Sometimes the problems can overlap.
The most common causes following a RAM upgrade include:
RAM Incompatibility – The RAM type (DDR3, DDR4, etc.), speed (MHz), and capacity should match the motherboard’s specifications. If it doesn’t, this can cause a BSoD.
Mixing RAM – If you have two RAM sticks of one make, model, and specification and install a third one that has different specs, this can cause problems.
Bios Issues – Incompatible, outdated, or corrupted BIOS/UEFI firmware prevents the system from properly utilizing the RAM, leading to errors.
Third-Party Software Conflicts – Some third-party applications, especially security software, can conflict with new hardware and prevent it from installing properly.
Overheating – Overheating from a powerful RAM upgrade can cause instability, leading to memory-related BSoDs.
Malware and Viruses – Malware like viruses and Trojans can infect various areas of the system including RAM and system files related to memory processing.
System Corruption – Any kind of system corruption, such as damaged system files, a broken Windows registry, failed Windows updates, hardware failure such as bad hard disk sectors, can all damage Windows and coincide with memory problems.
Overclocking – Pushing your RAM beyond its factory defaults can improve performance but if you go too far or use bad settings, a BSoD can occur.
How to fix Memory Management BSoD?
Because you just installed a new RAM module, the first step is to check the RAM itself, although other fixes and tweaks will help. Here’s what to do:
1. Check the RAM
The issue could be as simple as the RAM stick not being properly seated in its slot. Open the PC case and make sure it is fully snapped into place with the secure clips fully engaged. It’s also worth checking other sticks and components that may have been dislodged when you first installed it.
If you have multiple RAM sticks, it’s better to fit them alongside each other rather than leave empty slots in the middle.
Lastly, ensure there is proper airflow and your fans are working so overheating isn’t causing errors.
2. Check the RAM compatibility
Ensure that the new RAM is of the same type as the existing RAM or compatible with your motherboard. Most modern motherboards use DDR4 or DDR5, but some older systems may use DDR3. The new RAM stick should ideally match the speed of your existing RAM modules. You can usually find this information in your PC’s documentation or in the BIOS/UEFI settings.
You must also check how much RAM is already installed, and make sure the new RAM does not exceed the maximum capacity of your operating system and motherboard.
3. Update Windows and Scan for Malware
Proceed with any outstanding Windows updates and perform a Windows defender scan to ensure no malware is targeting your RAM.
Conversely, temporarily turn off any third-party antivirus software until a compatible RAM stick is recognized.
4. Run Windows Memory Diagnostic
Windows has a Memory Diagnostic tool built-in to the OS to check RAM for faults or configuration problems. To run a scan, follow these steps:
1. Press the Windows key and type Windows Memory Diagnostic.
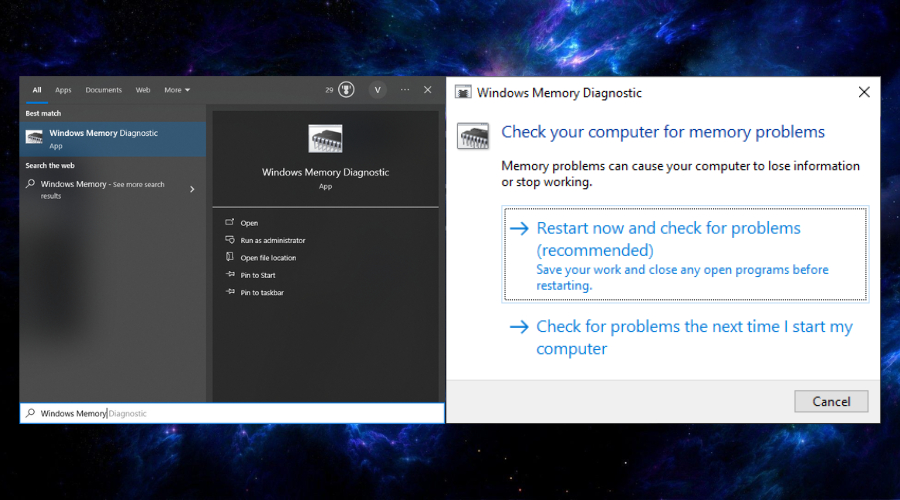
2. Click restart now and check for problems and your PC will automatically run the memory diagnostic.
3. Wait for the scan and keep an eye on its progress.
4. Once complete, your PC will restart again. If problems are detected, Windows Memory Diagnostic will display a summary of results.
5. You may need to replace or repair the faulty RAM modules.
5. Revert Overlocking
If you have overlocked your new RAM, go back to the default settings to see if this solves the memory management BSoD. This also applies to any recent overclocking of the CPU or graphics card.
6. BIOS/UEFI Updates
Ensure your motherboard’s BIOS/UEFI firmware is up to date. Some updates can improve RAM compatibility. To do this, navigate to the support or downloads section of the manufacturer’s website.
1. Download the latest BIOS/UEFI update for your motherboard model. Make sure you download the correct version, as using an incompatible update can cause issues.
2. Some motherboards allow you to update the BIOS/UEFI directly from the BIOS settings, but others may require a bootable USB drive.
3. Restart your computer and, during the startup process, press the specific key or key combination (e.g., F2, F12, Delete) to enter the BIOS/UEFI settings.
4. Depending on your motherboard, look for an option such as BIOS Update, UEFI Update, or similar.
5. Follow the on-screen instructions or select the update file from your bootable USB drive.
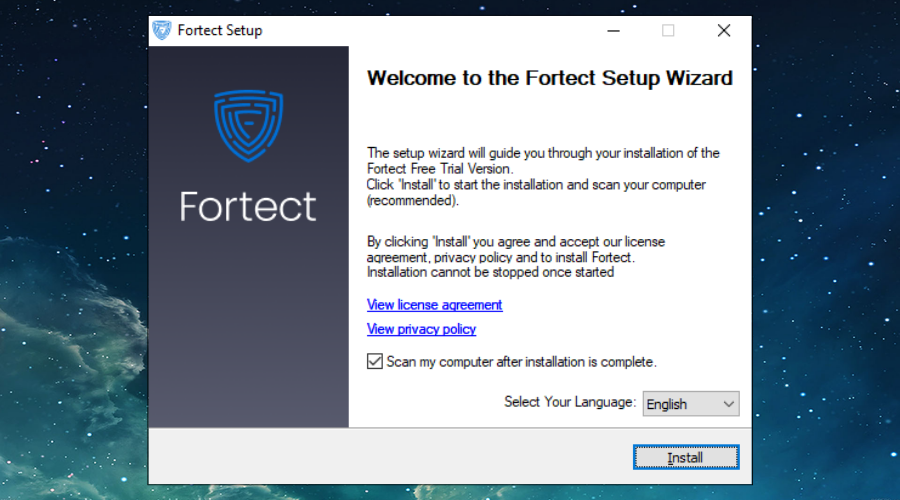
7. Repair Corrupt System Files
If Windows itself is corrupted, it can lead to all kinds of errors and BSoDs. You can try the built-in SFC utility, though a Windows repair tool like Fortect does this and more.
1. Download and Install Fortect on your PC.
2. Launch Fortect and Start Scanning. It will perform a system-wide analysis, checking for issues in the Windows registry, missing DLLs, and other memory related BSoD problems. It quickly identifies issues by comparing your system to its database of healthy Windows configurations.
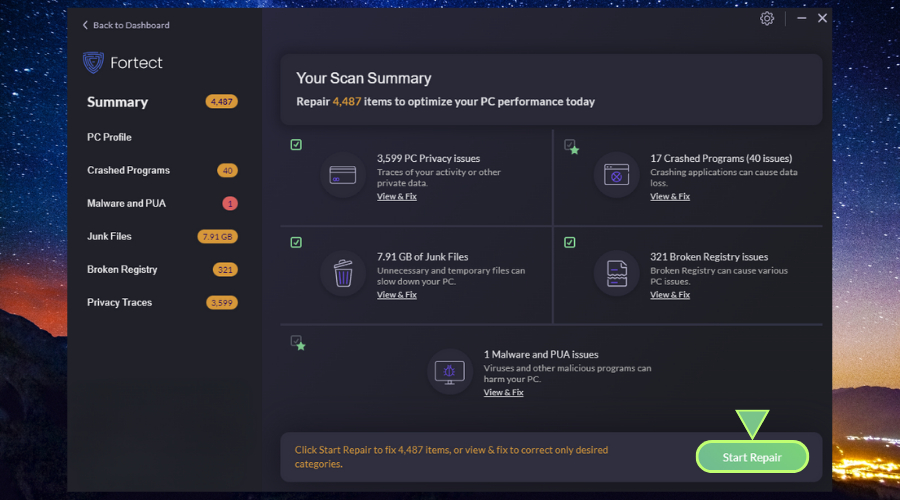
3. Click on Start Repair to replace the problematic files with working versions from Fortect’s constantly updated repository.
4. Restart your PC, after the repair and scan processes are completed.
Fortect is particularly useful for memory problems because it displays a system and hardware summary after scanning. You can quickly see if one of your memory modules isn’t recognized and needs reseating or replacing.


