
SOLVED: VPN Exploits via Browser Extensions on Windows
Your VPN promises privacy and security, but malicious browser extensions can undermine that protection. If you’re a Windows user relying on VPN software to safeguard your online activity, understanding how browser extensions exploit VPN connections is critical to maintaining your digital security.
What Are VPN Exploits via Browser Extensions?
VPN exploits through browser extensions occur when malicious or compromised add-ons bypass your VPN tunnel, expose your real IP address, or intercept encrypted traffic. These extensions leverage browser vulnerabilities to redirect data outside your secure VPN connection, rendering your privacy measures ineffective.
Common Browser Extension Vulnerabilities
Browser extensions with excessive permissions can access your browsing data, modify network requests, and even disable VPN protection without your knowledge. Attackers use techniques like WebRTC leaks, DNS hijacking, and proxy manipulation to route traffic around your VPN tunnel. Free VPN extensions are particularly risky, as many collect and sell user data or inject tracking scripts into websites you visit.
How Extensions Compromise VPN Security
Malicious extensions can detect when you’re connected to a VPN and specifically target that connection. They may alter DNS settings to bypass the VPN’s secure DNS servers, forcing queries through compromised servers that log your activity. Some extensions monitor WebRTC connections, which can leak your actual IP address even when your VPN is active.
How to Detect VPN Leaks from Browser Extensions on Windows
Step 1: Test for IP and DNS Leaks
Open your web browser while connected to your VPN and navigate to ipleak.net or dnsleaktest.com. These services reveal your visible IP address and DNS servers. Your VPN provider’s servers should appear in the results; if you see your ISP’s DNS servers or your real IP address, you leak.
Step 2: Check WebRTC Leaks
Visit browserleaks.com/webrtc while your VPN is active. This tool shows whether WebRTC is exposing your local IP address. If you see your actual IP address listed, browser extensions or WebRTC itself may be compromising your VPN protection.
Step 3: Audit Installed Extensions
Open your browser’s extension management page (chrome://extensions/ for Chrome or Edge, about: addons for Firefox). Review every installed extension and remove any you don’t recognize or actively use. Pay special attention to VPN extensions, ad blockers, and proxy tools; these have the highest risk of exploitation.
How to Prevent Browser Extension VPN Exploits on Windows 10/11
Fortect Browsing Protection: Automated Defense Against Extension Threats
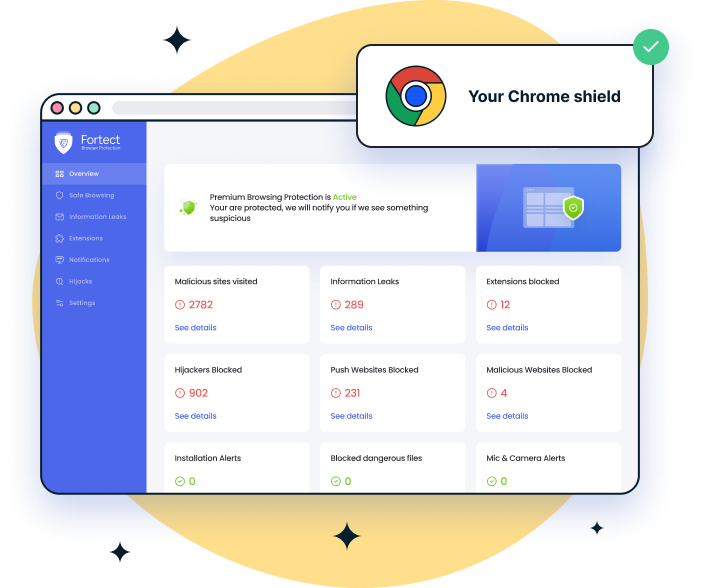
Manually managing browser security can be overwhelming. Fortect Browsing Protection delivers automated defense against VPN-compromising extensions through an easy-to-use Chrome extension that requires zero configuration.
Comprehensive Protection Features:
Install the extension in seconds and receive an immediate threat assessment with automatic scanning. Fortect detects and removes harmful extensions automatically while blocking malicious websites that could exploit your VPN connection. The extension alerts you about suspicious websites and extensions before they pose security risks, preventing search hijacking that redirects traffic outside your VPN tunnel.
Advanced features include data leak detection that monitors for email and personal data breaches, extension installation alerts in the Chrome Store for safer downloads, and push notification management to eliminate disruptive pop-ups. Real-time updates ensure continuous protection against emerging browser-based VPN exploits.
For users seeking comprehensive protection without manual configuration, Fortect Browsing Protection works seamlessly alongside your VPN to maintain complete security.
What makes Fortect stand out is its powerful antivirus engine with real-time malware protection that keeps your entire system safe from all types of threats. It also includes advanced browser protection to secure your online activity.
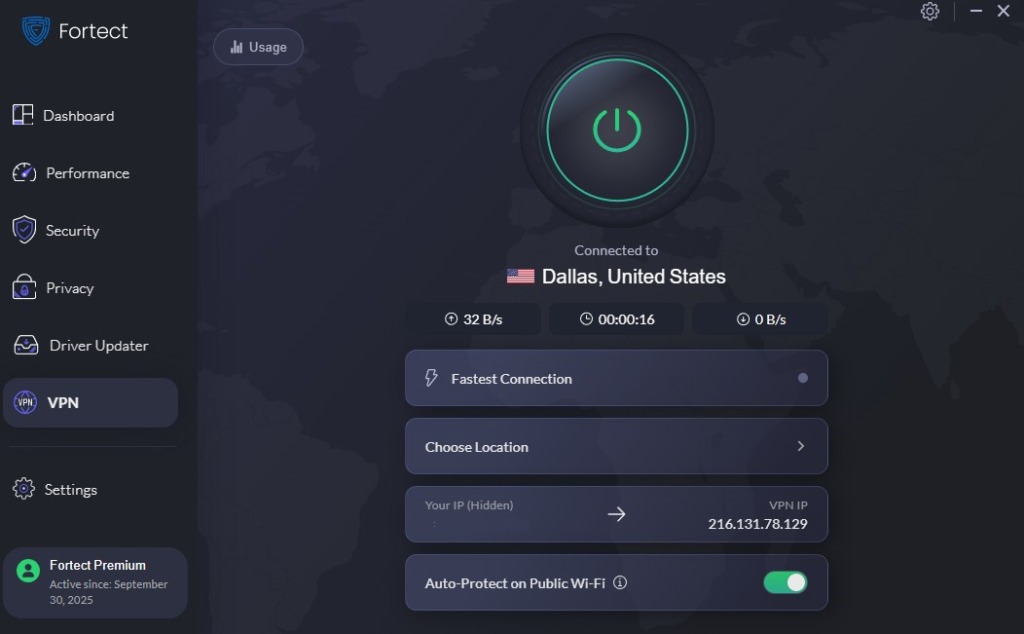
For users who need reliable privacy on the go, the new Fortect Premium now comes with a built-in VPN. Its Auto-Protect feature automatically activates on public Wi-Fi, encrypting your internet traffic and shielding your data from hackers. This ensures your connection remains private and secure, even on open networks vulnerable to zero-day and other cyberattacks.
Download Fortect now for complete protection, and you can get the Fortect Browning Protection extension via Google Chrome Extension.
Disable WebRTC in Your Browser
For Chrome and Edge:
- Install the “WebRTC Leak Prevent” extension from the official Chrome Web Store
- Click the extension icon and select “Disable non-proxied UDP”
- Alternatively, type chrome://flags in the address bar
- Search for “WebRTC” and disable relevant features
For Firefox:
- Type about:config in the address bar and press Enter
- Click “Accept the Risk and Continue”
- Search for media.peerconnection.enabled
- Double-click to set the value to false
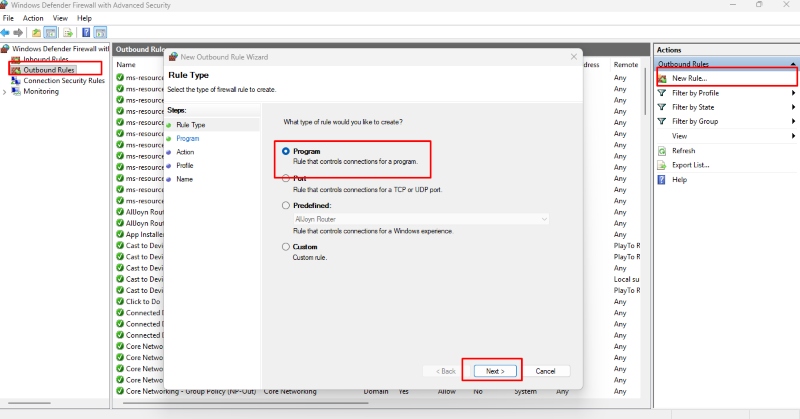
Configure Windows Firewall to Force VPN Traffic
- Press Windows + I to open Settings
- Navigate to “Privacy & Security” > “Windows Security” > “Firewall & network protection”
- Click “Advanced settings” to open Windows Defender Firewall
- Select “Outbound Rules” in the left panel
- Click “New Rule” in the right panel
- Choose “Program” and click Next
- Select your browser’s executable file (typically in C:\Program Files)
- Choose “Block the connection” and click Next
- Apply the rule to all profiles (Domain, Private, Public)
- Create another rule allowing connections only through your VPN’s network adapter
Enable DNS over HTTPS in Windows 11
- Press Windows + I to open Settings
- Go to “Network & Internet” > “Ethernet” or “Wi-Fi”
- Click “Hardware properties”
- Scroll to “DNS server assignment” and click “Edit”
- Select “Manual” and toggle IPv4 to “On”
- Enter a trusted DNS provider (1.1.1.1 for Cloudflare or 8.8.8.8 for Google)
- Under “DNS over HTTPS,” select “On (automatic template)”
- Click Save
Review Extension Permissions Regularly
Limit extensions to only those you absolutely need. Before installing any extension, review its permissions carefully. Extensions requesting access to “read and change all your data on websites” or “read your browsing history” should be avoided unless from verified, reputable developers. Check extension reviews and research the developer’s reputation before installation.
Use Your VPN’s Built-In Browser Protection
Many reputable VPN providers offer browser-specific features like built-in leak protection, tracker blocking, and extension compatibility modes. Enable these features in your VPN client settings. Some VPNs offer dedicated browser extensions that work in conjunction with their desktop application; use these official extensions instead of third-party alternatives.
Keep Your Windows System Updated Against Vulnerabilities
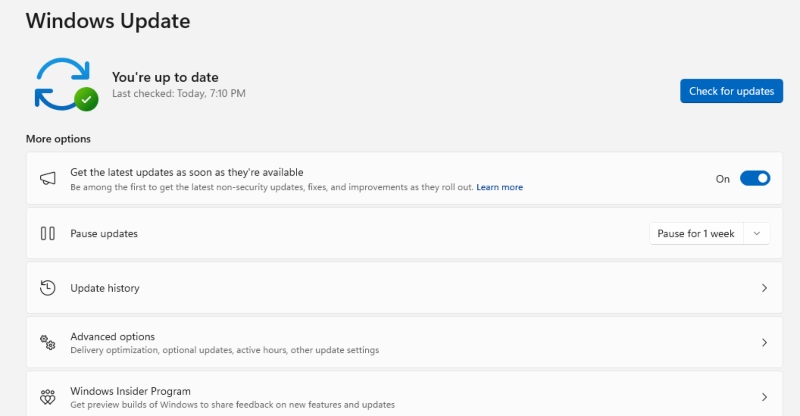
- Press Windows + I to open Settings
- Select “Windows Update” from the left sidebar
- Click “Check for updates”
- Install all available updates, including optional quality updates
- Enable “Get the latest updates as soon as they’re available” for improved security
Regular Windows updates patch browser vulnerabilities that malicious extensions exploit. Microsoft releases security updates monthly, addressing known exploits that affect browser performance and VPN stability.
Stay Protected
VPN security depends on more than just the VPN software itself. Browser extensions represent a significant attack vector that can completely undermine your privacy protection. By auditing your extensions, disabling WebRTC, configuring proper firewall rules, and keeping Windows up to date, you’ll close the gaps that attackers exploit. Your VPN can only protect you if your browser isn’t working against it.


